
This is the step-by-step guide to getting progressive glasses that I wish I had when I got my first pair last year. As a physician and an artist who is very near-sighted, I depend on my glasses to see clearly and accurately. I learned the hard way how to get progressive glasses that work. I wrote this guide with the hope that it’ll make it easier and better for you and other readers to get progressives that work.
Don’t have time to read the details? Here are the top 3 most crucial things I learned (click to jump to that section):
- Find an optometrist who has a lot of experience with making the progressive lenses you want and uses digital measurements for your position-of-wear.
- Choose glasses frames that have vertical heights of at least 30 mm and stay in a very stable position on your face.
- Make sure all the measurements for the type of lenses you’re getting are taken accurately with a digital measuring tool while you are wearing the frames at the exact position you’ll be wearing them, and make sure all the measurements are all submitted accurately to the lab.
The detailed step-by-step guide below will be most useful if you have a high or complex prescription, have a “non-average” face, need to see clearly and accurately, and plan to get “premium” progressive lenses. If you have a simple and low prescription and an average sized face, you might be able to see well enough with standard (and cheaper) progressive glasses at outlets like Zenni, which only require precise pupillary distance measurements and a lens height of at least 30 mm. My partner has a very simple low prescription and is ok with the default/standard measurements used to make his progressives, though he says that his reading zone is small.
Background and history
As we age, our eyeball lenses lose flexibility and stiffen, and the muscles that change the lens shape weaken, making it harder to focus on near objects such as books and phones (presbyopia). This process happens to everyone, usually starting in our 40s. For those of us who are already near-sighted (myopia), we eventually need two prescriptions, one to see distance and one to see near. If we add in computer monitor use, we also need to see clearly in the intermediate zone, leading to three prescriptions.
Some of us can get by for a while with the distance single-vision prescription in one lens and the near single-vision prescription in the other lens. My first optometrist saved me a ton of money and headache by making glasses for me this way, and they lasted for a good 8 years. Contact lens wearers use this technique. At some point, as our presbyopia (reading blurriness) gets worse, the difference in these prescriptions gets wider, and it might get harder to see clearly with this setup. This happened to me. Then we might consider getting bifocals, trifocals, or progressive lenses.
Modern progressive lenses are so much better than the simple versions of the 1950s and the bifocals popularized by Benjamin Franklin in the 1780s. Bifocal lenses have two viewing zones, a larger distance area and a smaller near/reading area in the bottom half of the lens. Progressive lenses have a large upper area for distance viewing, a corridor in the center that gradually transitions your distance prescription to your near/reading prescription and allows you to see clearly in the intermediate zone, such as computer monitors. Premium progressive lenses are further customized for how your glasses are positioned on your face and for your specific vision needs. This gives you better clarity where you need it most, and reduces distortion and blur, especially along the periphery.

Yet many of us pay for expensive premium progressive lenses without getting the technological benefits because our optometrists do not submit a complete set of measurements to the lens labs. As a result, we struggle needlessly to adapt to the progressive lenses. Some of us are told to purchase a separate pair of reading glasses. You don’t need to resort to this! Remember that the point of getting progressive lenses is to have a single pair of glasses with which you can see distance (walking, driving), intermediate (computer monitors), and near (reading, writing, phones). With the proper measurements and prescription, progressive lenses can be made to work for you.
Why are the measurements so important? I learned the hard way that many opticians (including mine) fail to take the precise measurements needed to make use of the technological advances in modern progressive lenses, even though they have been around since the 1980s. It is too easy for optometrists to order premium lenses (and receive greater profit margins) without doing the premium work, and over half of them do this. When the optometrist doesn’t submit your position-of-wear parameters, the lab uses default measurements for standard face sizes and eye positions. If you’re lucky, you can adapt to the default design. If you are not a default/standard person (like me), you can’t see clearly out of the proper lens zones for distance, intermediate and near. Things will look blurry and distorted. It feels like objects are “swimming” when you move your eyes around to view them. When this happened to my first pair of progressive lenses, I struggled to adapt.
Our eyes and brains are amazing, and can even adapt to terribly designed glasses, so some of us eventually learn to tolerate tiny reading zones, blur and distortion. Some of us are labeled “non-adapters” and are told that we need a separate pair of reading glasses. When my optometrist told me this, I was confused. Wait, wasn’t the point of paying for the super expensive progressives to not have separate pairs of distance and reading glasses?? Then I realized that opticians make a lot more money when you buy more pairs of glasses instead of fixing the existing pair. It’s certainly in their financial best interest for you to be a non-adapter and buy more glasses more frequently.
This is when I knew something was wrong. I had spent $1,000+ on these progressive glasses and refused to buy another pair of glasses. I dug into the science of progressive lenses and researched how they work. This is how I discovered why position-of-wear measurements are so important, and what my optometrist failed to do and should be doing. After sending my glasses back to the lab 3 times (because each time my optometrist only fixed some and not all of the measurements), I finally got a pair of progressive glasses that I wear all day for clear near, intermediate and distance vision.
Below is the detailed step-by-step guide that summarizes what I learned about how to get progressive glasses that actually work.
Detailed Guide
Step 1: Find an optometrist who has a lot of experience with making the brand and type of progressive lenses you want and uses digital measurements for your position-of-wear parameters. Get your exam and measurements.
The accuracy of position-of-wear measurements is crucial for the lab so they can place your distance, intermediate and near prescriptions in the correct locations on your lenses. Digital measuring devices increase measurement accuracy and consistency compared to manual measurements by about 10-fold. In a 2023 survey, 37% of glasses retailers reported having digital measuring devices, but only 51% used them most of the time. It’s likely that more optometrists and retailers have and use digital measuring devices now, but it’s not guaranteed that just because they have one they know how to use it well. Ask if they use them regularly to submit customized progressive lens orders.
My first mistake was choosing an optometrist solely based on the fact that his shop carries the brand of glasses frames I like best and is located conveniently near my home. After my first pair of progressive lenses failed, I researched reasons why and realized the importance of accurate position-of-wear measurements. I learned how digital measurements are accurate within 0.1 mm while manual measurements are inconsistent and often vary by more than 1 mm. With progressive lenses, 1+ mm can make the difference between seeing clearly or not.
Up to that point the optometry staff had only taken my pupillary distance (PD) and pupil height measurements manually with a little plastic ruler. I asked my optometrist about using a digital measuring device, which automatically and accurately takes all position-of-wear parameters needed for my lenses. It turns out that he had had a digital measuring device for years but seemed to never/rarely use it. He dug it out and used it with me after I asked several times, but later I discovered he didn’t know how to send the measurements to the lab. Eventually, after the second failed pair, I asked him to manually cross-check his lab order with the digital measurements and make sure they matched. This optometrist is a young, hip guy with a fancy, highly-rated shop, so you’d think that he’d use up-to-date equipment. Nope. Looks can be deceiving. He used a basic ruler and ancient wooden protractor for my measurements. His manual vertex measurements were inaccurate and inconsistent, leading to different numbers each time.
I also learned that optometrists often have special contracts with specific brands of lenses to get kick-backs, and will use only one brand. It turns out my optometrist contracted with Hoya primarily, and I wanted Zeiss SmartLife Individual progressive lenses. I have used many lens brands in my 40+ years wearing glasses (including Hoya and Essilor/Crizal), and I have found that Zeiss lenses and coatings give me the best clarity, color accuracy and durability. I didn’t realize how unfamiliar with Zeiss lenses my optometrist was, and after the first failed pair, I saw that he did not measure and submit 8 of the 10 position-of-wear parameters on the Zeiss lab order form.
So, as an example, next time I buy a pair of progressive glasses, I will:
- Research which optometrists work regularly with Zeiss lens labs,
- Ask how much experience they have with Zeiss SmartLife Individual progressive lenses, and
- Ask if and how often they use a digital measurement device to submit the position-of-wear parameters to the lab.
After you’ve identified an optometrist who has the skills, equipment and experience to make proper progressive glasses, get your exam for your progressive lenses prescription, choose your frames and get your position-of-wear parameters measured.
Step 2: Choose glasses frames that have vertical heights of at least 30 mm and stay in a very stable position on your face.
Progressive glasses frames need to have enough vertical height to fit the distance, intermediate and near zones on the lenses. Approximately 30 mm is the minimum to have enough space to comfortably fit all the zones. Premium lenses can be made with shorter heights but when the height is <30 mm, each zone will be compressed, sacrificing the intermediate and near/reading areas. This means the transition from distance to near vision will be more abrupt, and you will be left with a small intermediate area for viewing computer monitors, and a tiny little area at the very bottom of your lenses to see your phone and read printed text.
Choosing glasses that fit stably in one position on your face helps each visual zone to stay in the correct place for your eyes. I chose frames that unfortunately have weak nose pad arms. When the nose pad arms shift position even by a millimeter, my zones, vertex distance and tilt change, so I start seeing blur and distortions. I needed to constantly readjust their position. Eventually I gave up on using the arms and stuck silicone nose pads on my frames, which hold my glasses in place better.
Step 3: Make sure all the measurements for the type of lenses you’re getting are taken accurately with a digital measurement device while you are wearing the frames at the exact position you’ll be wearing them. Make sure all these position-of-wear parameters are submitted accurately to the lab.
For the most basic prescription progressive glasses (e.g. through online retailers like Zenni or chains like Costco), a precise pupillary distance is required, while for premium progressive lenses (the default ordered at most private optometry offices, especially when you have vision insurance), the following personal position-of-wear measurements are standard:
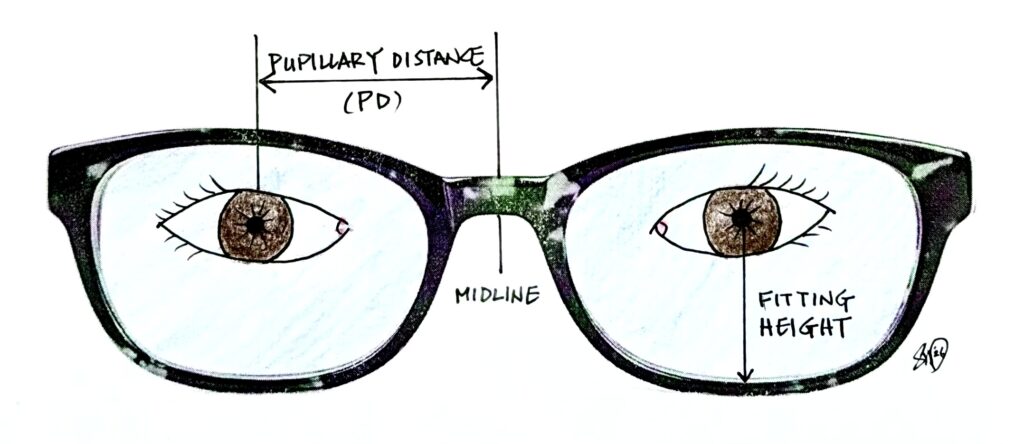
- Pupillary distance (PD) is the distance between pupil centers in mm. This one is required even for basic prescription lenses so proper placement of the optical center can be made. PD errors >1 mm for strong prescriptions can create eye strain that makes them unwearable. Manual PD measurements typically have 0.5-2 mm variance, whereas digital PD measurements are consistent within 0.5 mm.
- Fitting height is the vertical position of the pupil relative to the lens center in mm. When the fitting height is off, the distance and near zones are too high or too low, making reading difficult.
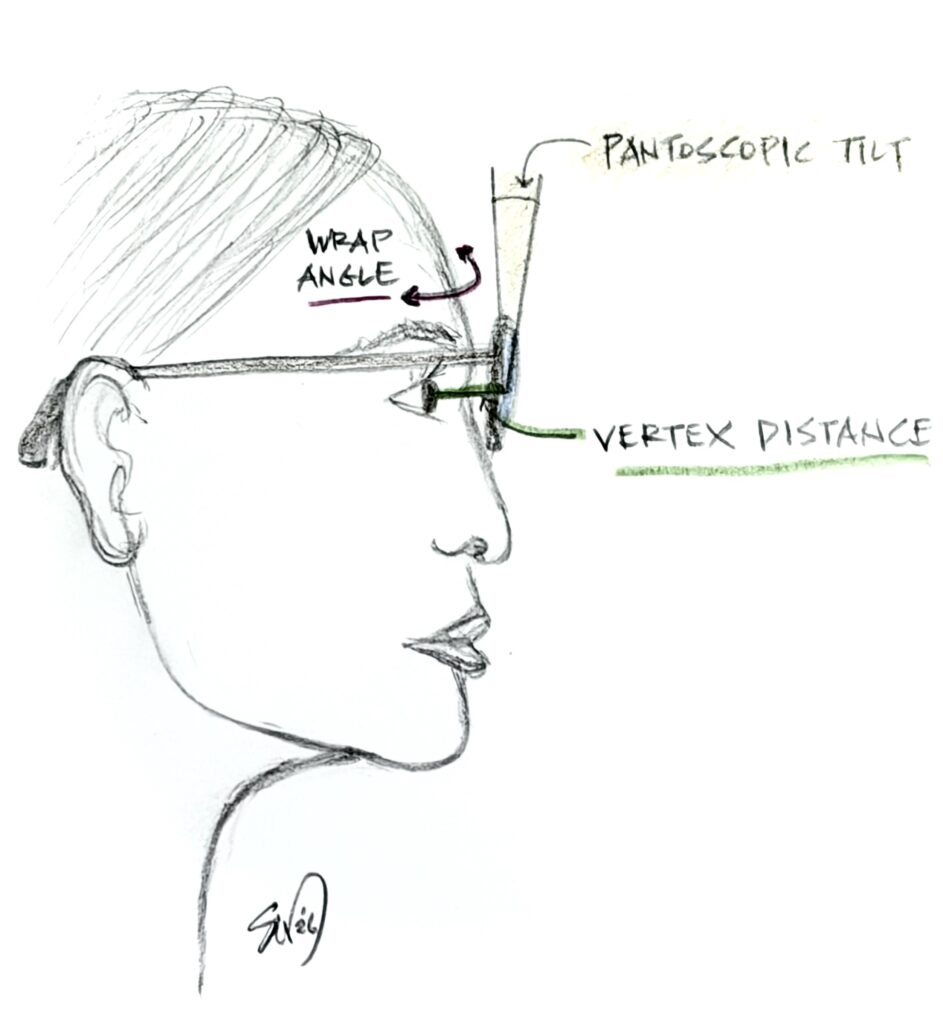
- Vertex distance is the distance from the cornea to the lens back surface in mm. The vertex distance determines the refraction power and corridor of progressive lenses. When it is incorrect, the power is off, and the corridor can appear distorted. Even a 1 mm change in distance can make reading blurry, especially for high prescriptions. My optometrist did not measure the vertex distance for my first pair of lenses, so the default 13 mm was used to make them. My vertex distance is actually 8 mm, and the 5 mm difference in measurements made that first pair unusable. Everything in the intermediate and near zone was blurry and distorted.
- Pantoscopic tilt is the forward tilt angle of frame and lenses relative to your visual axis, in degrees. My optometrist got the tilt mixed up with the pantoscopic angle and incorrectly measured the angle between the frame front and the temple off my face. The tilt must be measured with you wearing the frame in a natural head position because it varies by the position of your ear and nose relative to your visual axis. A digital measurement device will measure this within 0.1𝆩 accuracy. Manual measurements involve marking the pupil center looking near and far while you are wearing the frames in their final fitting position and tend to have a 2𝆩 variance.
- Wrap angle is the horizontal curvature of the frame in degrees. When the wrap angle is incorrect, the lens is not aligned to the way your glasses curve around your face, and you get peripheral blur and “swim.”
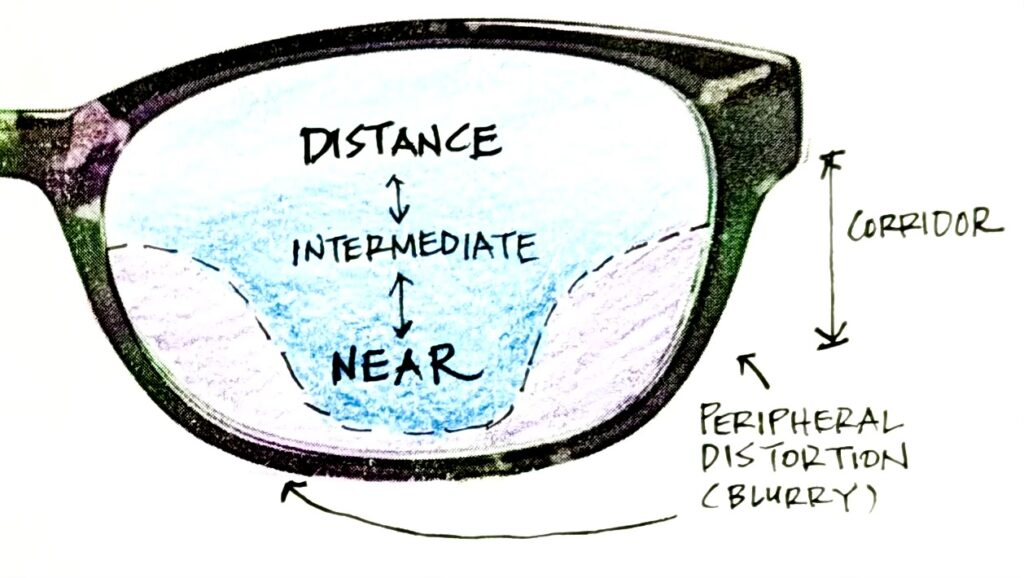
- Corridor length is the vertical distance from the pupil center down to the near/reading zone.
- Short (11-14 mm) corridors are needed in smaller frames with heights <30 mm and result in quicker shifts from the distance to near zones. This results in a more abrupt change in power and a smaller intermediate zone.
- Medium corridors (14-16 mm) have a moderate progression between distance and near zones. For a usable reading zone of 4-7 mm, use a medium corridor with fitting heights of 19-22 mm.
- Long corridors (16-18 mm) fit larger frames and create a longer, smoother progression from distance to near zones, and a larger intermediate zone for computer monitor viewing, but the reading zone is smaller and lower down on the lenses.
- The default corridor on most premium progressive lenses is sometimes calculated by the fitting height minus 3 mm. They appear to be prioritizing a smoother transition and larger intermediate zone at the sacrifice of the reading zone. For me, this resulted in a long corridor, which created a small and very low 2 mm near/reading zone on my first pairs of progressive lenses. I could see the computer monitor clearly but the reading area was too tiny. I changed the corridor on my final pair to the medium length, which gave me a larger useful reading area.
You and your optometrist may also modify your refraction powers (near, intermediate and distance vision prescriptions) depending on what you need to see most clearly. For example, if you’re an artist who needs to see teeny details up close, you might need more magnification in the near zone. If you’re a field scientist who needs to see animals/objects far away and use a computer monitor, you might want to prioritize a super sharp distance prescription and a longer intermediate zone.
It is such a relief for me to finally have progressive glasses that work so I can see clearly without needing multiple pairs of glasses. It took a lot of trial and error, and I learned a lot in the process.
I hope that this guide helps you understand and get progressive glasses that work for you!