
Late summer and fall is the perfect time to save tomato seeds to grow on your own. I find that the seeds from locally or home-grown tomatoes have nearly a 100% sprout rate. They are primed to grow well where you live. Enjoy!
The details:
Heirloom tomatoes are easy to grow at home and evolved to be infinitely tastier than store-bought ones, which are picked before ripeness and bred for long truck rides and shelf stability.
Tomato seeds are hardy, so if you can’t do all these steps, you can just smear a bunch of seeds into a paper towel and let them dry, and if you remove remaining gooey stuff or fruit, they will usually keep well. Following all the steps below helps keep the seeds mold-free and primed for sprouting later on.
Steps for saving tomato seeds:
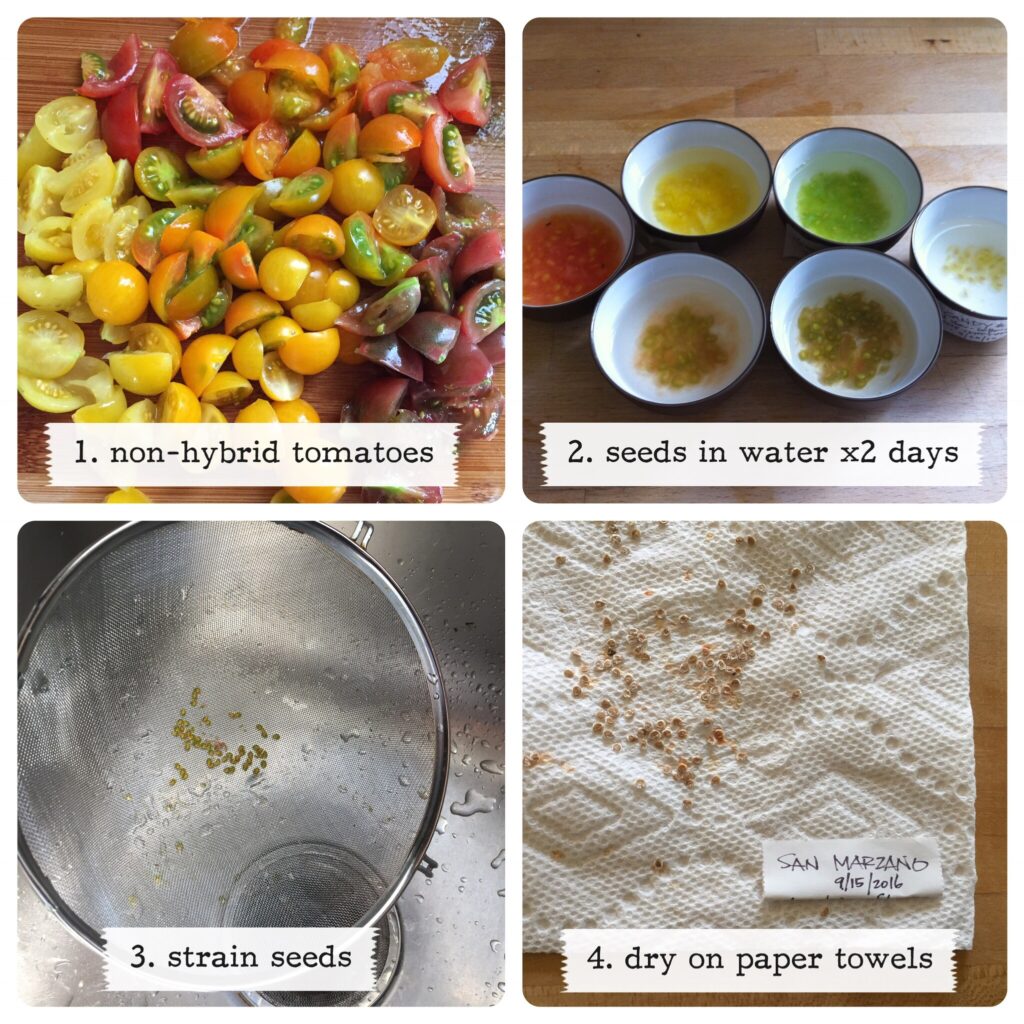
1. Gather your favorite non-hybrid tomatoes. Non-hybrid, heirloom tomatoes (such as San Marzanos, Super Snow Whites, Black Cherries, and Blondkopchen, pictured here) have seeds that you can grow the same tomato from. Hybrid tomatoes (such as Early Girl, Sun Gold, Sweet Million) are cross-bred, and the seeds may not grow at all or won’t grow the same type of tomato.
2. Scoop or squeeze out the seeds into a cup and cover with water for about 2 days. This step helps separate the seeds from the fruit and primes them to sprout later on. You may notice that the water bath starts to ferment; this is a normal part of the priming process. I think it mimics what happens in nature, when ripe tomatoes fall into the ground and ferment, ready for sprouting the following year.
3. Strain and wash the seeds in a fine strainer to remove remaining bits of tomato fruit and juice. This helps keep the seeds mold-free while in storage.
4. Dry the seeds completely on a paper towel. Once totally dry, remove them without any remaining fruit goo or shards and store them in a packet or envelope.
Steps for sprouting and planting: What works for us in the Bay Area of California…
- Seed starting: Around the lunar new year in late January or February, I start my next round of tomato plants in seedling planters with rich seed-starter soil, keeping them as warm as possible near a sunny window. Some folks use warming mats and/or covers to generate more warmth and help the seeds sprout.
- Potting up: If the starters get big for the planters, I transplant the best sprouts to quart or gallon pots, burying their stems up to their 2nd set of leaves so they can grow more roots from their stem.
- I usually plant them outside in the ground or in 5-gallon pots around May, when nighttime temperatures are consistently above 50’F. Again, I bury the stems up to their second set of leaves so they can grow more roots from the buried stem.
Using seeds from the tomatoes that grow from my own yard or from neighboring yards, I get near-100% sprout rate and amazingly tasty tomatoes that are acclimated to our conditions.
Enjoy your home-grown tomatoes!
They are so delicious simply sliced and paired with fresh mozzarella, extra-virgin olive oil and sea salt.
And if you have too many tomatoes to eat fresh (or starchy tomatoes like san marzanos), you can make a super-umami tomato sauce by cooking them with olive oil and salt until you get the concentration and taste you like, then using an immersion blender to cut up the chunks (we leave the skins in for the fiber and dense flavor). Freeze serving-sized (1-2 cups) amounts in freezer-safe containers, and you’ll have fresh-tasting homemade tomato sauce all year ’round. Tomato-riffic!