
Shibori combines two of my craft loves: origami and fabric dyeing. You fold and press fabric like origami, create resist patterns with boards, clamps, string and/or rubber bands, and then dye the package. When you unfold and release the fabric, you get interesting patterns unique to each dye job. Shibori (しぼり) is the Japanese term used commonly in English text to describe this fabric-dyeing technique, but it was introduced to Japan from China, where it is called 絞 (jiǎo). The technique is practiced all over the world using a wide variety of indigenous dyes, including Malaysia and Indonesia in Southeast Asia, Rajasthan, India and the Himalayas in South Asia, Peru, the Middle East, Northern and Western Africa.
I wanted to learn shibori from an Asian perspective, so I bought Shibori: The Inventive Art of Japanese Shaped Resist Dyeing by Yoshiko Wada and read through these great online tutorials: Dharma Trading, Honestly WTF and Better than Jam studios. In this post, I show how I used four shibori techniques with indigo vat dyeing.
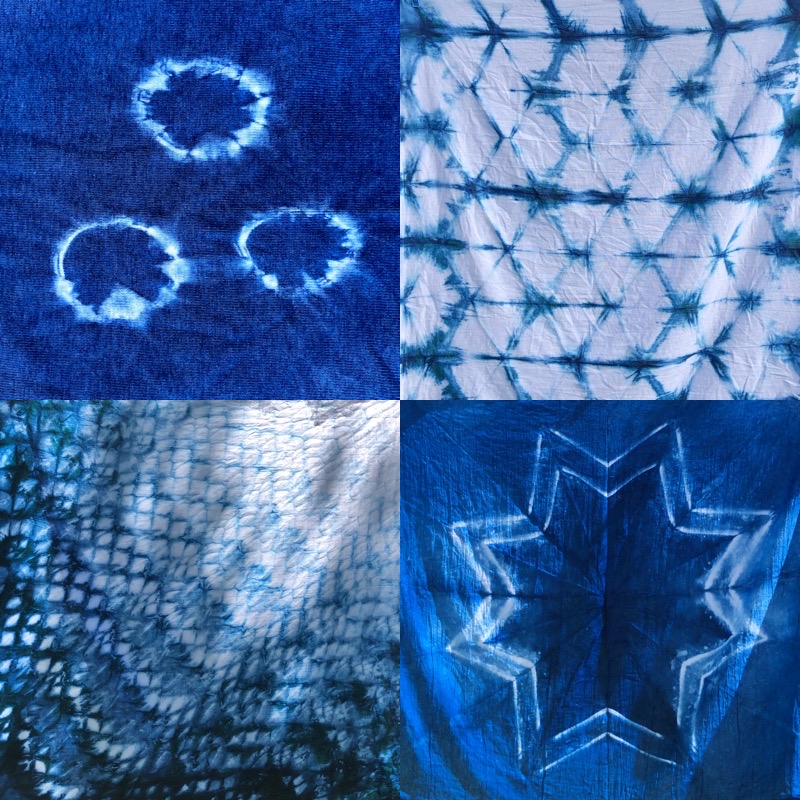
4 awesome and easy shibori techniques

1. Kumo (bound) ring pattern: Use rubber bands to bind rocks and marbles in the wet fabric. Then dip in indigo vat or generously apply dye to exposed areas. This is a super easy technique that my kid enjoyed making.

2. Itajime (folded and pressed) kikkō turtle shell pattern: This technique is in Yoshiko Wada’s book. Natalie Stopka has detailed online tutorial for it here.
- Fold the wet cloth accordion-style into a long column, then folded the column into equilateral triangles.
- Use thick rubber bands to bind the wooden boards that came with the kit over the middle of the folded cloth.
- Dip or generously apply dye to the exposed areas.

3. Arashi (rolled and scrunched) storm/honeycomb pattern: After my failed pole-wrapping arashi attempt, I decided to try this simpler technique, scrunching fabric around a rope. I followed Karin Persan’s Better than Jam instructions.
- Find a thick rope, such as an outdoor laundry line.
- Roll the dry fabric in either straight-on or diagonally.
- Scrunch the fabric: tighter to make smaller “honeycombs” or looser to make larger ones.
- Soak the piece in water before dipping it in dye.
- Lessons learned: I had large white areas in some of my pieces, so next time I might experiment with wetting the fabric before rolling and scrunching and keeping the rolls looser.

4. Star pattern (folded and pressed): I found this technique in the Dharma Trading tie-dye book. I dyed my first piece by applying colored dyes in squeeze bottles and my second piece using the indigo vat.
- Fold wet fabric in quarters.
- Fold into long triangles radiating from the center using accordion folds.
- Place two chopsticks about an inch apart at an angle.
- Bind the chopsticks on both sides tightly with rubber bands.
- Dip or generously apply dye to the exposed areas.
That’s it! Hope you had fun learning about shibori. In future posts, I will share more adventures in indigo dyeing (batik-style relief and ombre) and sun printing.